Need to buy replacement parts?
Sign up for a parts subscription and save!
Hassle free auto-deliveries when it's time to replace parts.
Free Shipping in Contiguous US. No commitment, change anytime.

Replacing Your Core 750 Filter
Filter Replacement Indicator 
Yellow filter replacement light comes on to indicate filter has been used for 4 months, it may need to be replaced soon. In more extreme environments, it may require replacement immediately. The indicator light will turn red once filter needs to be placed after 6 months of use. Follow the instruction below to change filter and reset the filter timer. Check your filter after yellow indicator light comes on, if it looks dirty like the one in the video, we recommend replacing the filter immediately.

Follow these steps to change your filter
- Ensure power is off, then unplug machine from power source.
- Find the lock on the base of the unit.
- Unlock by sliding lock mechanism to the left.
- Lift up the top of the unit by the Top Rim.
- Remove old filter and place new filter into the same location as the original.
- Replace the top of the unit and slide the lock back to the right side.
- Press filter button for 5 seconds to reset the filter timer. The yellow or red light will flash then turn off to indicate filter timer has been reset successfully.
Replacing Your PCO Recharge Cell
PCO Replacement Indicator 
- The PCO Replacement Indicator light turns yellow when the Recharge Cell is still working but has reduced operation and needs to be replaced immediately.
- The PCO Replacement Indicator light turns red when your purifier unit has operated for enough hours that the Recharge Cell must be replaced and has stopped working.
- Once a new Recharge Cell has been installed (see Replacing Recharge Cell section below for instructions), the PCO Replacement Indicator error lights will turn off to indicate PCO function is operating normally again.
Replacing PCO Recharge Cell
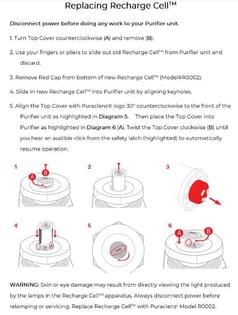
1. NOTE: Disconnect power before doing any work to your Purifier. Turn Top Cover counterclockwise (A) and remove (B).

2. Use your fingers or pliers to slide out old Recharge Cell from Core 750 and discard.

3. Remove Red Cap from bottom of new Recharge Cell (Model#R0002).
4. Slide in new Recharge Cell into Purifier unit by aligning keyholes.

5. Align the Top Cover with Puraclenz logo 30° counterclockwise to the front of the Purifier unit as highlighted in Diagram 5. Then place the Top Cover into Purifier as highlighted in Diagram 6 (A). Twist the Top Cover clockwise (B) until you hear an audible click from the safety latch (highlighted) to automatically resume operation.

Recycle used Recharge Cell by following your local municipality guidelines.
Replacing Core 750 Lamp
UV Lamp Replacement Indicator 
NOTE: This is an error indicator light only, it does not turn on or off the Germicidal UV Lamp function during normal operation. The indicator will remain off during normal use.
The UV Lamp indicator will turn red when the Germicidal UV Lamp has reached the end of its usable life either from detection of a damaged lamp or from reaching 20,000 operating hours counted. At this time, the Core 750 Lamp should be replaced immediately.
Once a new Germicidal UV lamp has been installed (see Germicidal UV Lamp Replacement section for instructions), the red UV Lamp light on the button should turn off automatically to indicate successful lamp replacement. However, it is still necessary after replacing lamp, to long press the UV lamp indicator for 5 seconds to reset UV lamp timer.
Replacing the Core 750 Lamp
WARNING: Ultraviolet radiation is dangerous to eyes and skin, please do not use Germicidal UVC emitter outside the device. Please do not look into the UV lamp when it is ON.
- Ensure power is off, then unplug machine from power source.
- Find the lock on the base of the unit.
- Unlock by sliding lock mechanism to the left.
- Lift up the top of the unit by the Top Rim.
- Remove the filter.
- Remove the black UV housing.
- Remove the old UV lamp by pulling up on the base of the UV lamp. Recycle old UV lamp by following your local municipality guidelines.
- Take care to hold white portion only of new UV lamp. Do not touch its glass tube. Place the new UV lamp back into the socket by aligning its pins to match socket.
Please Note: When installing the Lamp, that the pins are designed to only fit in the correct orientation.

9. Reinstall the black UV housing and the filter.
10. Replace the top of the unit and slide the lock back to the right side.
11. Successful UV lamp change will be indicated by the UV lamp light turning off.
WARNING: Skin or eye damage may result from directly viewing the light produced by the lamps in the Recharge Cell and Core 750 Lamp apparatus. Always disconnect power before re-lamping or servicing. Replace Lamp with Puraclenz Model#R0011.
Recycle used Core 750 Lamp by following your local municipality guidelines.